MongoDB 分片
在Mongodb里面存在另一种集群,就是分片技术,可以满足MongoDB数据量大量增长的需求。
当MongoDB存储海量的数据时,一台机器可能不足以存储数据,也可能不足以提供可接受的读写吞吐量。这时,我们就可以通过在多台机器上分割数据,使得数据库系统能存储和处理更多的数据。
为什么使用分片
- 本地磁盘不够大
- 当请求量巨大时会出现内存不足。
- 垂直扩展价格昂贵(内存、磁盘、cpu)
MongoDB分片
下图展示了在MongoDB中使用分片集群结构分布:
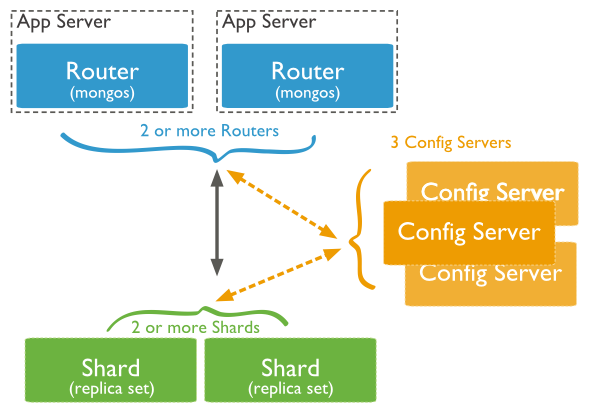

上图中主要有如下所述三个主要组件:
Shard:
用于存储实际的数据块,实际生产环境中一个shard server角色可由几台机器组或者一个relica set承担,防止主机单点故障
Config Server:
路由表服务。每一台都具有全部chunk的路由信息。
Query Routers:
前端路由,客户端由此接入,且让整个集群看上去像单一数据库,前端应用可以透明使用。
分片实例
分片结构端口分布如下:
Shard Server 1:27031
Shard Server 2:27032
Config Server: 27100
Route Process: 27777
步骤一:启动Shard Server
sudo rm -rf /MongoDB/shard/s1 /MongoDB/shard/s2 /MongoDB/shard/log
sudo mkdir -p /MongoDB/shard/s1 /MongoDB/shard/s2 /MongoDB/shard/log
sudo mongod --port 27031 --dbpath=/MongoDB/shard/s1
sudo mongod --port 27032 --dbpath=/MongoDB/shard/s2
步骤二: 启动Config Server
sudo rm -rf /MongoDB/shard/config
sudo mkdir -p /MongoDB/shard/config

sudo mongod --port 27100 --dbpath=/MongoDB/shard/config
注意:这里我们完全可以像启动普通mongodb服务一样启动,不需要添加—shardsvr和configsvr参数。因为这两个参数的作用就是改变启动端口的,所以我们自行指定了端口就可以。
步骤三: 启动Route Process
mongos --port 27777 --configdb 192.168.17.129:27100
步骤四: 配置Sharding
接下来,我们使用MongoDB Shell登录到mongos,添加Shard节点
mongo admin --port 27777
MongoDB shell version: 2.0.7
connecting to: 127.0.0.1:27777/admin
mongos> db.runCommand({ addshard:"192.168.17.129:27031" })
{ "shardAdded" : "shard0000", "ok" : 1 }
......
mongos> db.runCommand({ addshard:"192.168.17.129:27032" })
{ "shardAdded" : "shard0009", "ok" : 1 }
步骤五:对某个数据库test启用分片
mongos> db.runCommand({ enablesharding:"test" }) #设置分片存储的数据库
{ "ok" : 1 }
步骤六:对collection进行分片
mongos> db.runCommand({ shardcollection: "test.mycol", key: { _id:1}})
{ "collectionsharded" : "test.mycol", "ok" : 1 }
步骤五:测试
mongo test --port 27777
输出10000条数据
程序代码内无需太大更改,直接按照连接普通的mongo数据库那样,将数据库连接接入接口27777
步骤六: 查看分片情况
查看分片情况时,必须在config(配置服务器上执行) 而且必须在admin(如mongo 127.0.0.1:27100/admin)集合下执行
mongo admin --port 27100  #config(配置服务器上执行)
sh.status()
输出如下:
-- Sharding Status ---
  sharding version: {
    "_id" : 1,
    "minCompatibleVersion" : 5,
    "currentVersion" : 6,
    "clusterId" : ObjectId("57cfcdfef06b33543fdeb52e")
}
  shards:
    {  "_id" : "shard0000",  "host" : "localhost:27031" }
    {  "_id" : "shard0001",  "host" : "localhost:27032" }
  active mongoses:
    "3.2.7" : 1
  balancer:
    Currently enabled:  yes
    Currently running:  no
    Failed balancer rounds in last 5 attempts:  0
    Migration Results for the last 24 hours:
        1 : Success
  databases:
    {  "_id" : "test",  "primary" : "shard0000",  "partitioned" : true }
        test.mycol
            shard key: { "_id" : 1 }
            unique: false
            balancing: true
            chunks:
                shard0000    2
                shard0001    1
            { "_id" : { "$minKey" : 1 } } -->> { "_id" : 1 } on : shard0001 Timestamp(2, 0)
            { "_id" : 1 } -->> { "_id" : 57 } on : shard0000 Timestamp(2, 1)
            { "_id" : 57 } -->> { "_id" : { "$maxKey" : 1 } } on : shard0000 Timestamp(1, 3)
了解分片原理
mongo admin --port 27100  #config(配置服务器上执行)
use config
> db.chunks.find().pretty()
{
    "_id" : "test.mycol-_id_MinKey",
    "lastmod" : Timestamp(2, 0),
    "lastmodEpoch" : ObjectId("57da5df2bb44f821e869eaeb"),
    "ns" : "test.mycol",
    "min" : {
        "_id" : { "$minKey" : 1 }
    },
    "max" : {
        "_id" : 1
    },
    "shard" : "shard0001"
}
{
    "_id" : "test.mycol-_id_1.0",
    "lastmod" : Timestamp(2, 1),
    "lastmodEpoch" : ObjectId("57da5df2bb44f821e869eaeb"),
    "ns" : "test.mycol",
    "min" : {
        "_id" : 1
    },
    "max" : {
        "_id" : 57
    },
    "shard" : "shard0000"
}
{
    "_id" : "test.mycol-_id_57.0",
    "lastmod" : Timestamp(1, 3),
    "lastmodEpoch" : ObjectId("57da5df2bb44f821e869eaeb"),
    "ns" : "test.mycol",
    "min" : {
        "_id" : 57
    },
    "max" : {
        "_id" : { "$maxKey" : 1 }
    },
    "shard" : "shard0000"
}
> db.settings.find()
{ "_id" : "chunksize", "value" : NumberLong(64) }
我们可以看见刚开始的块分裂成了三块分别是(-∞,1)在shard0001上,[1,57]和[57,+∞)在shard0000上。
说明:这里需要说明的是MongoDB中的区间是左闭右开的。
查看结果db.mycol.stats()
mongo --port 27777
use test
switched to db test
mongos> show collections
mycol
mycol111
mycol2

db.mycol.stats()
Hashed Sharding
选择哈希片键最大的好处就是保证数据在各个节点分布基本均匀,下面使用_id作为哈希片键做个简单的测试:
mongo admin --port 27777
mongos> db.runCommand({ shardcollection: "test.myhash", key: { _id:"hashed"}})
{ "collectionsharded" : "test.myhash", "ok" : 1 }
use test
var num =10000
for (var i=0;i<num;i++){
    db.myhash.save({'_id':i})
}
总结:哈希分片将提供的片键散列成一个非常大的长整型作为最终的片键。